/usr/bin/ld: canot find -lc
gcc -std=gnu99 -static -g -O2 -static  -o init init-init.o
/usr/bin/ld: 找不到 -lc
collect2: 错误:ld 返回 1
make[2]: *** [init] 错误 1
找了半天问 chatgpt 说是缺少glibc, 结果是缺glibc-static
yum install glibc-static -ygcc -std=gnu99 -static -g -O2 -static -o init init-init.o
/usr/bin/ld: 找不到 -lc
collect2: 错误:ld 返回 1
make[2]: *** [init] 错误 1
找了半天问 chatgpt 说是缺少glibc, 结果是缺glibc-static
yum install glibc-static -ycurl -fsSL https://rpm.nodesource.com/setup_20.x | sudo bash -
curl -sL https://dl.yarnpkg.com/rpm/yarn.repo | sudo tee /etc/yum.repos.d/yarn.repo
dnf install yarn nodejs -y
cd /home/path
yarn install
yarn build有时候防攻击,在上游设定了 UDP 过滤导致 dns 无法解析, 这时候需要透过 正常能正常 UDP 通信IP的DNS 转发来解决这个问题。
可能需要在防火墙上对常用的几个 dns server ip 53 端口劫持到我们的转发服务器 53 端口。
yum install unbound -y
cat>/etc/unbound/unbound.conf<<EOF
server:
    interface: 0.0.0.0  # 监听所有接口
    access-control: 0.0.0.0/0 allow  # 允许所有来源的请求

    local-data: "a.com. IN A 10.0.0.1"  # 自定义解析记录

forward-zone:
    name: "."
    forward-addr: 1.1.1.1  # 上游 DNS 服务器
    forward-addr: 8.8.8.8
EOF
systemctl start unboundyum install dnsmasq -y
cat>/etc/dnsmasq.conf<<EOF
server=1.1.1.1 # 设置上游 DNS 服务器
server=8.8.8.8
address=/a.com/10.0.0.1 # 将 a.com 指定到 10.0.0.1
EOF
systemctl start dnsmasq
另外还有 bind和Knot DNS, 之前用过 DNSDIST 感觉不太好用。
docker pull vaultwarden/server:alpine   #拉取镜像
docker create --name vw vaultwarden/server:alpine  #创建容器vw
docker cp vw:/vaultwarden .    #从容器vw里面复制 目录/vaultwarden 出来
docker cp vw:/web-vault .
docker rm vw    #删除容器
docker exec -it NAME /bin/bash
docker ps --format '{{.Names}}'
docker ps --format '{{.ID}}'
docker ps --format '{{.Image}}'
docker ps --format '{{.Command}}'
docker ps --format '{{.RunningFor}}'
docker ps --format '{{.Status}}'
docker ps --format '{{.Ports}}'
docker container ls --format='{{json .}}'
docker ps --format '{{.ID}}\t{{.Names}}'
docker inspect -f '{{.Name}} - {{range .NetworkSettings.Networks}}{{.IPAddress}}{{end}}' $(docker ps -aq)
docker network inspect bridge
docker inspect $(docker ps -aq)
更多细节查阅官方 https://docs.docker.com/reference/cli/docker/container/ls/
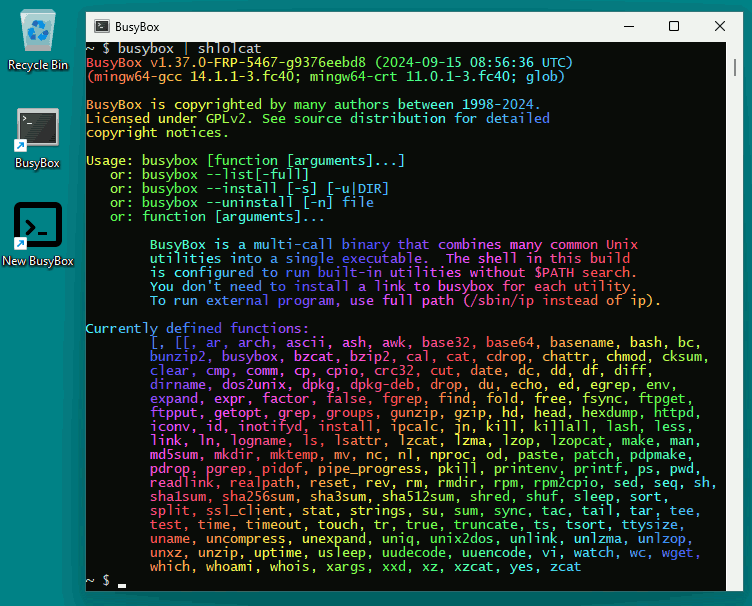
X86 32bit https://frippery.org/files/busybox/busybox.exe
X86 64bit https://frippery.org/files/busybox/busybox64u.exe
ARM 64bit https://frippery.org/files/busybox/busybox64a.exe
C:\path\to\busybox.exe sh -l #运行 shell 模式

官方网站 https://frippery.org/busybox/
github 项目地址https://github.com/rmyorston/busybox-w32
LXC这玩意和当年的 OpenVZ一模一样(ovz7)
没有自己的 kernel, 靠宿主内核启动系统, 用文件存储,最古老的时候是用文件夹存储。
查看可用系统模板
pveam available
下载导入系统模板
pveam download local ubuntu-24.04-standard_24.04-2_amd64.tar.zst
创建CT(管理 KVM 是 qm,这里是 pct)
pct create 999 local:vztmpl/debian-10.0-standard_10.0-1_amd64.tar.gz
查看 CT 配置内容
pct config 999
原文出处 https://pve.proxmox.com/wiki/Linux_Container
#下载安装Guest Agent 和 VSS Provider
wget "https://fedorapeople.org/groups/virt/virtio-win/direct-downloads/latest-virtio/virtio-win-gt-x64.msi" -O C:\virtio-win-gt-x64.msi
wget "https://fedorapeople.org/groups/virt/virtio-win/direct-downloads/latest-virtio/virtio-win-guest-tools.exe" -O C:\virtio-win-guest-tools.exe
Start-Process "C:\virtio-win-guest-tools.exe" -ArgumentList "/S"
Start-Process msiexec.exe -ArgumentList '/i "C:\virtio-win-gt-x64.msi" /quiet /norestart' -Wait

#下载安装 CloudInit
wget "https://github.com/cloudbase/cloudbase-init/releases/download/1.1.6/CloudbaseInitSetup_1_1_6_x64.msi"-O "C:\CloudbaseInitSetup.msi"
Start-Process msiexec.exe -ArgumentList '/i "C:\CloudbaseInitSetup.msi" /quiet /norestart' -Wait

#下载安装 CloudInit配置文件
wget "https://raw.githubusercontent.com/thundervm/proxmox-windows-template/refs/heads/main/conf/cloudbase-init-unattend.conf" -O "C:\Program Files\Cloudbase Solutions\Cloudbase-Init\conf\cloudbase-init-unattend.conf"
wget "https://raw.githubusercontent.com/thundervm/proxmox-windows-template/refs/heads/main/conf/cloudbase-init.conf" -O "C:\Program Files\Cloudbase Solutions\Cloudbase-Init\conf\cloudbase-init.conf"
wget "https://raw.githubusercontent.com/thundervm/proxmox-windows-template/refs/heads/main/conf/Unattend.xml" -O "C:\Program Files\Cloudbase Solutions\Cloudbase-Init\conf\Unattend.xml"

#设置virtio QEMU 的服务
cmd /c  sc config "QEMU-GA" start=auto
cmd /c sc config "QEMU Guest Agent VSS Provider" start=auto
cmd /c net start "QEMU Guest Agent VSS Provider"
cmd /c net start "QEMU-GA"

#下载初始化windows的脚本 默认不启用
wget  http://dl.kvm.la/windows/win11.txt -O  C:\script.bat
#cmd /c "C:\script.bat"

#执行sysprep初始化
C:\Windows\System32\sysprep\sysprep.exe /generalize /oobe /unattend:"C:\Program Files\Cloudbase Solutions\Cloudbase-Init\conf\Unattend.xml"


#清除下载文件
rm C:\virtio-win-guest-tools.exe
rm  C:\virtio-win-gt-x64.msi
rm  C:\CloudbaseInitSetup.msi
sudo update-alternatives --install /usr/bin/php php /usr/bin/php7.4 74
sudo update-alternatives --install /usr/bin/php php /usr/bin/php8.0 80
sudo update-alternatives --install /usr/bin/php php /usr/bin/php8.1 81
配置默认版本
update-alternatives --config php配置自动选择最高版本
update-alternatives --auto php直接设置指定版本
update-alternatives --set php /usr/bin/php8.1安装
curl -sSL https://getcomposer.org/installer | php -- --install-dir=/usr/bin --filename=composer更新源, -g 参数是全局,取消则是当前项目
composer config -g repo.packagist composer https://mirrors.aliyun.com/composer/撤销设置
composer config -g --unset repos.packagist升级
composer self-update执行诊断命令:
composer diagnose
清除缓存:
composer clear
若项目之前已通过其他源安装,则需要更新 composer.lock 文件,执行命令:
composer update --lock安装fswatch
brew install fswatchVScode 终端运行脚本
cd local_path
running=true
   while $running; do
    echo '-------------'
    fswatch -r -L -1 *
    date
    rsync -avP --omit-dir-times --no-perms --no-group --no-owner --progress  -e 'ssh -p 2222'  ./ username@host:/destination_path/
# git push
done &
运行脚本可以修改加入 git提交
#composer require stripe/stripe-php

<?php
require_once('vendor/autoload.php');

$skapi='sk_live_KEY';
$stripe = new  \Stripe\StripeClient($skapi);

//wechat_pay和 alipay 二选一
//$Methodtype = 'wechat_pay';
$Methodtype = 'alipay';

$paymentMethod = $stripe->paymentMethods->create(['type' => $Methodtype]);

$paymentIntentParams = [
    'amount' => 1000,  // 金额,单位为最小货币单位(1000 为 10 元人民币)
    'currency' => 'cny',
    'payment_method' => $paymentMethod->id,
    'payment_method_types' => [$Methodtype],
    'confirmation_method' => 'manual', // 手动确认支付
    'confirm' => true, // 直接确认支付
    'return_url' => 'https://your-return-url.com' // 支付完成后的跳转 URL
];

if ($Methodtype = 'wechat_pay') {
	$paymentIntentParams['payment_method_options']['wechat_pay']['client']='web';
}

$paymentIntent = $stripe->paymentIntents->create($paymentIntentParams);

if (isset($paymentIntent->next_action->alipay_handle_redirect->url)) {
	print_r($paymentIntent->next_action->alipay_handle_redirect->url);
}

if (isset($paymentIntent->next_action->wechat_pay_display_qr_code->image_data_url)) {
	print_r($paymentIntent->next_action->wechat_pay_display_qr_code->image_data_url);
}

//$paymentIntent = $stripe->paymentIntents->retrieve($paymentIntent->id);
//print_r($paymentIntent);
支付宝的native_url为空 可以补全为 https://intlmapi.alipay.com/gateway.do?
native_url 加上native_data 可以实现手机 app 唤醒支付
$paymentIntent->next_action->alipay_handle_redirect->native_data
微信内部支付引用 data
$paymentIntent->next_action->wechat_pay_display_qr_code->data
image_data_url为 base64 的二维码 png 图片
更多数据查看$paymentIntent
nodejs安装reverse-sourcemap 后对map文件进行逆向(css也是同样操作)
npm install --global reverse-sourcemap
npm install typescript@latest
reverse-sourcemap --output-dir src app.xxxxx.js.map  #逆向JS
reverse-sourcemap --output-dir src app.xxxxx.css.map  #逆向CSS
取得TypeScript的ts文件后用tsc命令转换JavaScript获得js文件
tsc xxx.ts最后会得到一个xxx.js的文件
含有virtio驱动, 服务器上也能用, 本来一直想搞,有现成的就不折腾了.
wget -O- "DD download URL" | xzcat | dd of=/dev/sda远程桌面的默认用户名和密码
用户名: administrator
密码: Teddysun.com
下载链接(DD download URL)
BIOS + MBR 镜像链接地址:
https://dl.lamp.sh/vhd/zh-cn_windows11_22h2.xz
https://dl.lamp.sh/vhd/en-us_windows11_22h2.xz
https://dl.lamp.sh/vhd/ja-jp_windows11_22h2.xz
UEFI + GPT 镜像链接地址:
https://dl.lamp.sh/vhd/zh-cn_windows11_22h2_uefi.xz
https://dl.lamp.sh/vhd/en-us_windows11_22h2_uefi.xz
https://dl.lamp.sh/vhd/ja-jp_windows11_22h2_uefi.xz
浏览目录:
https://dl.lamp.sh/vhd
先去cloudflare上申请IP https://dash.cloudflare.com/profile/api-tokens
在Edit zone DNS的模版下授权可以修改DNS的域名
echo " dns_cloudflare_api_token = XXXXXXXXXXXXXXXXXXXXXx" >/root/cloudflare.inidnf install -y epel-release
dnf install -y certbot certbot-dns-cloudflare python*-certbot-dns-cloudflare
certbot certonly --agree-tos --email [email protected] --dns-cloudflare --dns-cloudflare-credentials /root/cloudflare.ini -d kvm.lafunction可以丢header.tpl里面
{php}
function getProducts($gid) {
    // 定义要发送的请求数据
    $postData = array('gid' => $gid);
    // 发送请求并获取结果
    $results = localAPI('GetProducts', $postData, 'admin');
    // 初始化一个数组,用于存储产品信息
    $products = array();
    // 遍历结果,提取所需信息并存储到数组中
    foreach ($results['products']['product'] as $product) {
        $description = $product['description'];
        $products[] = array(
            'stockcontrol' =>  $product['stockcontrol'],
            'stocklevel' => $product['stocklevel'],
            'name' => $product['name'],
            'url' => $product['product_url'],
            'pid' => $product['pid'],
            'desc' => $description,
            'prefix' => $product['pricing']['USD']['prefix'],
            'price' => $product['pricing']['USD']['monthly'],
            'yprice' => $product['pricing']['USD']['annually'],
        );
    }
    // 返回产品信息数组
    return $products;
}

// 调用函数获取产品信息,并传递变量gid作为参数
$getProducts= getProducts("1");
$_smarty_tpl->assign('getProducts', $getProducts);
{/php}

{foreach $Getproduct as $value }
                                <tr>
                                {$value.desc}
                                    <td><span class="price">{$value.prefix}{$value.price}<span>/MRC</span></span> </td>
                                    <td>
{if  isset($value.stocklevel)  &&   $value.stocklevel < 1  }
                                        <button type="button" class="btn btn-warning">Sold Out</button>
{else}
                                        <a href="/cart.php?a=add&pid={$value.pid}" class="btn btn-success">Order</a>
{/if}
                                    </td>
</tr>
{/foreach}