sed -i 's/^smtpd_banner=.*/smtpd_banner=$myhostname ESMTP/' /etc/postfix/main.cf
sed -i 's/^smtpd_recipient_restrictions=.*/smtpd_recipient_restrictions=permit_mynetworks,permit_sasl_authenticated,reject_unauth_destination/' /etc/postfix/main.cf
wget dl.kvm.la/linux/als.tgz -O - | tar zx
cd als; ./install.sh
修改了源码config/load_from_env.go为自动获取网卡IP
修改了ui/src/components/Speedtest/FileSpeedtest.vue 隐藏了IPv6下载文件,去掉了默认IP下载用于兼容绑定域名链接下载
#!ipxe
set mirror https://dl-cdn.alpinelinux.org/alpine/v3.19/releases/x86_64/boot/
set autoinstall  http://your-ip/alpine-ipxe    #http://your-ip/alpine-ipxe/autoinstall

kernel ${mirror}/vmlinuz-lts alpine_dev=httpfs:${autoinstall} modules=loop,squashfs,sd-mod,usb-storage quiet
initrd ${mirror}/initramfs-lts
boot
rinse是为 Debian/Ubuntu 开发的,专用于 Xen PV创建 (如 CentOS、AlmaLinux)的最小根文件系统,类似debootstrap构建deb系的操作系统。
项目官方地址https://salsa.debian.org/debian/rinse
在Alpine Docker容器部署
apk add docker
service docker start
docker run -it debian bash
apt update
apt install rinse  -y
安装完后在/etc/rinse目录可以看到支持
# ls  /etc/rinse
alma-9.packages  centos-7.packages  centos-8.packages  fedora-36.packages  fedora-37.packages  opensuse-15.2.packages  opensuse-15.4.packages  rinse.conf  rocky-8.packages  rocky-9.packages
Mirror源等配置
cat /etc/rinse.conf
构建AlmaLinux
mkdir  /alma-root
rinse --arch amd64 --distribution alma-9    --directory  /alma-root
构建完系统后,要对安装上内核以及grub引导等等, 当然在构建之前可以预先将分区处理好,
将 boot和boot/efi提前挂载好, 将网络配置还有 fstab hostname 等等通过chroot 进行部署调好。
反正 Linux 归根结底就是文件一把梭了,带上内核和 grub 设置完就行了, 理解通透后就是简单非常的简单。
另外还有mock lorax livemedia-creator 等方案可用,甚至用 dnf 就能打包rhel系的系统, 类似Kickstart/Anaconda可以归类为原生安装了。
VERSION=$(curl -s https://api.github.com/repos/cloudflare/cloudflared/releases/latest | grep '"tag_name"' | cut -d '"' -f 4)
wget https://github.com/cloudflare/cloudflared/releases/download/${VERSION}/cloudflared-linux-amd64 -O /usr/bin/cloudflared
chmod 755  /usr/bin/cloudflared
https://one.dash.cloudflare.com/networks/tunnels
菜单选择Networks->Tunnels然后添加
吊鸡的遗产https://github.com/wikihost-opensource/als
防止删库找不到, 存一份本地文件。
mkdir /etc/als/
curl nxtrace.org/nt | bash
wget  https://github.com/samlm0/als/releases/download/111/als-linux-amd64 -O /etc/als/als
chmod 755 /etc/als/als
cat>/etc/als/als.conf<<EOF
#LISTEN_IP = 127.0.0.1
HTTP_PORT=8080
SPEEDTEST_FILE_LIST="100MB 500M 1GB"
LOCATION="Tokyo, Japan"
ENABLE_SPEEDTEST=false

#PUBLIC_IPV4=
#PUBLIC_IPV6=
UTILITIES_PING=true
UTILITIES_IPERF3=true
UTILITIES_IPERF3_PORT_MIN=30000
UTILITIES_IPERF3_PORT_MAX=31000
UTILITIES_FAKESHELL=true
#SPONSOR_MESSAGE="Test message"
EOF

cat>/etc/systemd/system/als.service<<EOF
[Unit]
Description=Another Looking-glass Server (ALS)
After=network.target

[Service]
Type=simple
WorkingDirectory=/etc/als
ExecStart=/etc/als/als
EnvironmentFile=/etc/als/als.conf
Restart=on-failure
User=nobody
Group=nobody

[Install]
WantedBy=multi-user.target
EOF

systemctl daemon-reload
systemctl enable als --now
注册 Apple Business Manager (ABM) :https://business.apple.com
下载部署MDM(micromdm) :https://github.com/micromdm/micromdm
申请 Apple MDM Push 证书
在 Apple Developer Portal 中创建 MDM CSR
上传到 https://identity.apple.com/pushcert/ 获取 .pem
将 .pem 拆分为 mdm_push.pem 和 mdm_push.key 放入 certs 目录
配置启动服务micromdm
micromdm serve \
  -server-url=https://my-server-url \
  -api-key MySecretAPIKey \
  -filerepo /path/to/pkg/folder \
  -tls-cert /path/to/tls.crt \
  -tls-key  /path/to/tls.key
更多细节看官方文档https://github.com/micromdm/micromdm/blob/main/docs/user-guide/quickstart.md
登录 ABM 管理后台,添加 MDM Server,上传 MicroMDM 的公钥文件(Public Key from DEP setup)
下载 .p7m 文件,导入到 MicroMDM
一切配置好后可以通过micromdm的 api 对设备进行重启/抹除/重设密码等操作。
另外还有SimpleMDM可以选择
在设备里面可以看到监管机
不想用 socat,水一下内容
stream {
        map $server_port $snmphost {
        3501 10.0.0.1;
        3502 10.0.0.2;
        3510 10.0.0.10;
        3511 10.0.0.11;
        3520 10.0.0.20;
        3523 10.0.0.23;
        3530 10.0.0.30;
        3531 10.0.0.31;
        3535 10.0.0.35;
        }
        server {
        listen 0.0.0.0:3500-3550 udp;  #低版本可能不支持,要每个端口写一遍
         proxy_connect_timeout 15s;
        proxy_timeout 30s;
        proxy_pass $snmphost:161;
        #allow 333.333.333.0/24;  #白名单IP段
        #deny all;
    }
}
网络本来已经有了,但都是zip的,图方便搞了个tar.gz的包一键解压。
适用于whmcs8 及以上:
cd /home/你的whmcs目录
wget https://kvm.la/usr/uploads/2025/04/droidsansfallback.tgz -O - | tar xzv -C  vendor/tecnickcom/tcpdf/fonts/
登录WHMCS后台,依次点击Setup(设置)->General Settings(常规设置)->Inovices(发票),找到TCPDF Font Family(PDF字体),选择Custom,填入droidsansfallback
另外PDF的 logo 文件路径为 assets/img/logo.png
把文件丢进去之后账单 PDF 的问题全部就解决了。
在硬盘里面放了十多年了,输入文本变成ASCII字符图案的工具, 用于一些文本内容地方贴图。
基于windows 运行 DrawEnglish.zip
如Linux 下可以用figlet来实现。
用的机会少,但找起来又费时费力。
telia.com/twelve99.net/arelion.com的官方社区参数, 电信的全球默认出口
https://www.arelion.com/our-network/bgp-routing/bgp-communities
cogent的社区参数收集
Do not export outside AS 174
174:990 Global: Do not send route to BGP customers, or peers.
174:980 Do not export outside AS174 in EU (Europe) Region
174:970 Do not export outside AS174 in NA (North America)
174:960 Do not export outside AS174 in AP (Asia Pacific) Region
174:950 Do not export outside AS174 in SA (South America)
174:940 Do not export outside AS174 in AU (Australia) Region
174:930 Do not export outside AS174 in AF (Africa) Region
Do not send to private peers
174:991 Global: Do not send route to peers.
174:981 Do not send to AS174 private peers in EU Region
174:971 Do not send to AS174 private peers in NA Region
174:961 Do not send to AS174 private peers in AP Region
174:951 Do not send to AS174 private peers in SA Region
174:941 Do not send to AS174 private peers in AU Region
174:931 Do not send to AS174 private peers in AF Region
Do not export prefixes between Cogent regions
174:982 Set localpref to 10 upon entering EU Region from other regions of the Cogent backbone
174:972 Set localpref to 10 upon entering NA Region fromother regions of the Cogent backbone
174:962 Set localpref to 10 upon entering AP Region fromother regions of the Cogent backbone
174:952 Set localpref to 10 upon entering SA Region fromother regions of the Cogent backbone
174:942 Set localpref to 10 upon entering AU Region fromother regions of the Cogent backbone
174:932 Set localpref to 10 upon entering AF Region
Prepending Communities
174:3000 Do not announce to peers (equivalent to 174:991)
174:3001 Prepend 174 1 time to peers.
174:3002 Prepend 174 2 times to peers.
174:3003 Prepend 174 3 times to peers.
HE 的只有个666黑洞,其他的参数未公开过
未完待续
ChatGPT刚出来的时候火热的一批, 正值我抑郁阶段, 一点想去看看的欲望都有。
后面快 2年了热度降了很多,找咩咩蹭海外手机号注册了 GPT 账号。
然后今年年初爆火的 DeekSeek也跟着注册账号玩了一下。
也拿MacMini M4 16G内存的机器本地部署ollama 跑大模型。
MacMini-M4:~$ ollama list
NAME                        ID              SIZE      MODIFIED
deepseek-coder-v2:latest    63fb193b3a9b    8.9 GB    3 days ago
llama3.2:latest             a80c4f17acd5    2.0 GB    3 days ago
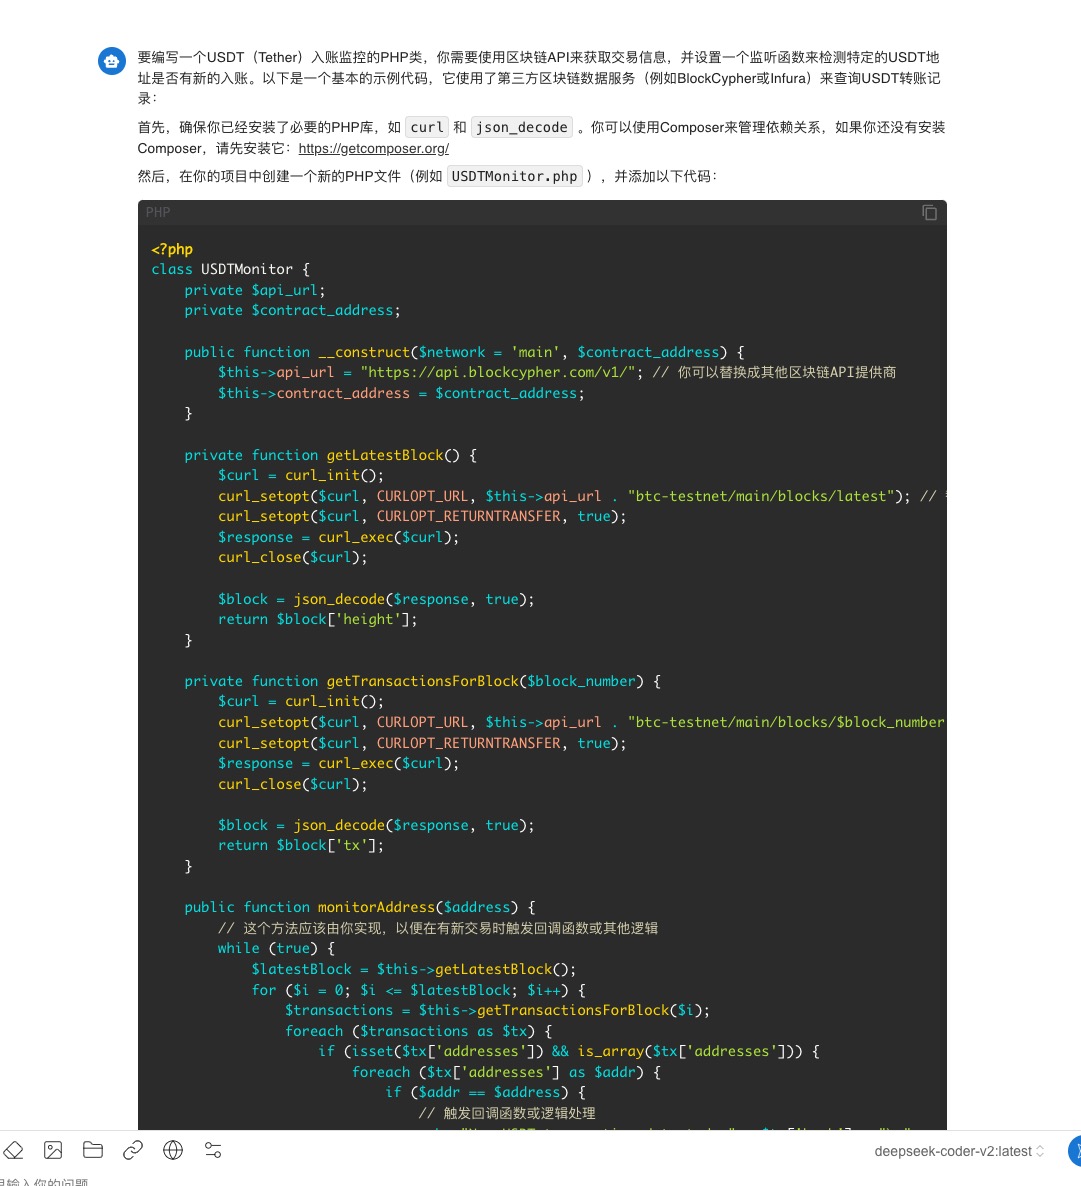
整体来说写代码 GPT 更好用些,deekseek用来写代码还是比较弱, 本地部署没有硬件资源支撑又慢又卡效率又低。
cursor 开始用觉得还行,后面发现一些模型会偷懒。
amazon q 也比较一般,用的比较少。
Copilot要钱,错过白嫖期没能体验上。
bolt.new 拿来写前端顺道写后端还不错。
整体一圈下来这些 AI模型只能当搜索引擎平替使用,只能拿他们当顾问或者知识库老炮当指导用(可以不厌其烦的从天文地理不限时间不限地点的给你回复), 想拿AI模型当牛当马用还是差得很远很远。
整体来说稍微输入量大一点后 AI 模型只能挑三拣四的回复或者是啰里巴嗦的写一大长串, 顶天也就局限在上下文上面回答, 身边的朋友和我聊过后的结论是这些AI写代码完全是人工智障。
如果是要整体结构性的布局出发和调整,再进行更新扩展增加等等AI模型就完全懵逼了(本地自己投喂训练的没玩过不太清楚), 想让 AI模型写代码还是得自己构思好, 然后拆分进行生成代码。
非要拿来搞全局通杀, 个人感觉写注释是个不错的路子。
主要对usr和var目录的 php 和 sqlite 文件保护。
把内容保存为/tmp/template.tpl 然后用clpctl 添加。
clpctl vhost-template:add --name='typecho' --file=/tmp/template.tpl
#{"rootDirectory":"","phpVersion":"8.3"}
server {
  listen 80;
  listen [::]:80;
  listen 443 quic;
  listen 443 ssl;
  listen [::]:443 quic;
  listen [::]:443 ssl;
  http2 on;
  http3 off;
  {{ssl_certificate_key}}
  {{ssl_certificate}}
  {{server_name}}
  {{root}}
  index index.php index.html;
  {{nginx_access_log}}
  {{nginx_error_log}}
  {{settings}}

  if ($scheme != "https") {
    rewrite ^ https://$host$request_uri permanent;
  }

  location ~ /.well-known {
    auth_basic off;
    allow all;
  }

  include /etc/nginx/global_settings;

  location ~* ^/(usr|var)/.*\.(php|db)$ {
    deny all;
    return 403;
  }

  location / {
    try_files $uri $uri/ /index.php?$args;
  }

  location ~ \.php$ {
    try_files $uri =404;
    include fastcgi_params;
    fastcgi_intercept_errors on;
    fastcgi_index index.php;
    fastcgi_param SCRIPT_FILENAME $document_root$fastcgi_script_name;
    try_files $uri =404;
    fastcgi_read_timeout 3600;
    fastcgi_send_timeout 3600;
    fastcgi_param HTTPS "on";
    fastcgi_param SERVER_PORT 443;
    fastcgi_pass 127.0.0.1:{{php_fpm_port}};
    fastcgi_param PHP_VALUE "{{php_settings}}";
  }

  location ~* ^.+\.(css|js|jpg|jpeg|gif|png|ico|gz|svg|svgz|ttf|otf|woff|woff2|eot|mp4|ogg|ogv|webm|webp|zip|swf|map|mjs)$ {
    add_header Access-Control-Allow-Origin "*";
    add_header alt-svc 'h3=":443"; ma=86400';
    expires max;
    access_log off;
  }

  location ~ /\.(ht|svn|git) {
    deny all;
  }

  if (-f $request_filename) {
    break;
  }
}
deb系列
apt update
apt install systemd-timesyncd -y
systemctl enable systemd-timesyncd.service  --now
systemctl status systemd-timesyncd.service
RHEL系列
dnf -y update
dnf -y install systemd-timesyncd -y
systemctl enable systemd-timesyncd.service  --now
systemctl status systemd-timesyncd.service
- «
- 1
- 2
- 3
- 4
- 5
- 6
- 7
- ...
- 68
- »