gcc版本切换
yum -y install centos-release-scl
yum -y install devtoolset-6-gcc*
scl enable devtoolset-6 bash
yum -y install centos-release-scl
yum -y install devtoolset-6-gcc*
scl enable devtoolset-6 bash
最近今天心血来潮又折腾了下fedora, 直接从23跳到34版本.
但是遇上了rpmlib(PayloadIsZstd) <= 5.4.18-1 is needed by 错误.
大致上就是rpmlib依赖包过不去又不想挨个版本升级,
简单搜索了下解决方案先升级到25 30 32 然后就可以升级至34最新了.
dnf system-upgrade download --releasever=34   --allowerasing --nogpgcheck    -y
dnf system-upgrade reboot
顺道看了下fedora自带php7.4 / mariadb 10.5 / nginx 1.20 也有openresty的支持, 其实用于个人的生产环境妥妥的简单省事.
现在windows10下的PowerShell下命令安装, 或者直接在商店里面搜索Windows Terminal并安装。
winget install --id=Microsoft.WindowsTerminal -e大致上看了一下可以支持各种配色,除了windows拉跨的字体渲染显示比较拉跨外,其他都还不错。
搭配一下OpenSSH再配置下RSYNC基本上用起来和Linux原生环境差不多了。
安装完后在cmd或者powershell里面运行wt就启动了, 接下来配色更换字体等等都可以DIY定制了。

自从Kvm进入内核自带后自己编译Xen内核相对比较麻烦, 已经很多年没玩Xen了.
Centos也停止Xen更新了, 另外还有个crc.id.au的一直在更新维护安装包.
https://xen.crc.id.au/downloads/
https://wiki.centos.org/HowTos/Xen/Xen4QuickStart
由于有现成的安装包, 就不用去编译内核了.
https://rpms.remirepo.net/wizard/
yum -y install epel-release -y
yum install https://rpms.remirepo.net/enterprise/remi-release-8.rpm
备用记录下, 下次装libzip不用去编译了.
yum -y --enablerepo=remi install libzip-last-devel yum -y install epel-release
yum -y install https://rpms.remirepo.net/enterprise/remi-release-7.rpm
yum -y --enablerepo=remi install libzip-last-devel
yum -y install gcc vim-enhanced gcc-c++ libtool-libs libtool autoconf subversion zip unzip wget crontabs iptables file bison patch mlocate flex diffutils automake imake make cmake kernel-devel cpp zlib-devel \
libevent-devel libxml2-devel freetype-devel gd gd-devel libjpeg-devel libpng-devel ncurses-devel \
curl-devel readline-devel openssl-devel glibc-devel glib2-devel bzip2-devel e2fsprogs-devel libidn-devel gettext-devel expat-devel libcap-devel libtool-ltdl-devel pam-devel \
libxslt-devel libc-client-devel freetds-devel unixODBC-devel libXpm-devel krb5-devel libicu-devel icu sqlite-devel libsodium-devel oniguruma-devel
wget https://www.php.net/distributions/php-8.0.11.tar.gz -O - | tar xz
cd  php-8.*
prefix="/opt/php8";
# --with-zip
 ./configure --quiet --prefix=$prefix/usr --with-config-file-path=$prefix/etc --sysconfdir=$prefix/etc --sbindir=$prefix/sbin --bindir=$prefix/bin --localstatedir=$prefix/var --enable-fpm --enable-bcmath --enable-exif --enable-ftp --enable-mbstring --enable-soap --enable-sockets  --with-curl --with-gettext --with-openssl  --with-mhash  --with-mysql-sock=/var/lib/mysql/mysql.sock --with-pdo-mysql=mysqlnd --with-mysqli=mysqlnd --with-imap --with-imap-ssl --with-kerberos --with-zlib --enable-intl=shared --enable-xml --disable-rpath --enable-shmop --enable-sysvsem --enable-mbregex  --enable-pcntl --enable-opcache --enable-exif  --with-sqlite3 --with-pdo-sqlite --enable-calendar --with-freetype --with-jpeg --enable-gd --with-sodium --with-zip --with-libdir=lib64 ;
make -j `grep name /proc/cpuinfo|wc -l`
make install
sed -i 's#expose_php = On#expose_php = Off#'  				php.ini-production
sed -i 's#;date.timezone =#date.timezone=Asia/Shanghai#g'  		php.ini-production
sed -i 's#;cgi.fix_pathinfo=1#cgi.fix_pathinfo=0#g' 			php.ini-production
sed -i 's#enable_dl = Off#enable_dl = On#' 				php.ini-production
sed -i 's#register_argc_argv = Off#register_argc_argv = On#'            php.ini-production
sed -i 's#short_open_tag = Off#short_open_tag = On#'  			php.ini-production
sed -i 's#output_buffering = Off#output_buffering = On#'  		php.ini-production
sed -i 's/memory_limit = 32M/memory_limit = 128M/g' 			php.ini-production
sed -i 's/post_max_size = 8M/post_max_size = 32M/g' 			php.ini-production
sed -i 's/upload_max_filesize = 2M/upload_max_filesize = 128M/g' 	php.ini-production
sed -i 's#allow_call_time_pass_reference = Off#allow_call_time_pass_reference = On#' 	php.ini-production
sed -i 's/disable_functions =/disable_functions="passthru,exec,system,chroot,chgrp,chown,shell_exec,proc_open,proc_get_status,ini_alter,ini_restore,dl,openlog,syslog,readlink,symlink,popepassthru,stream_socket_server,fsocket,popen"/g' php.ini-production

mkdir -p $prefix/etc/php-fpm.d
ln -s $prefix/bin/ph* /usr/bin/
ln -s $prefix/sbin/ph* /usr/sbin/
#cp ./sapi/fpm/php-fpm /etc/init.d/php-fpm      #弃用init.d
install -p -D -m 0644 sapi/fpm/php-fpm.service /usr/lib/systemd/system/
install -p -D -m 0644 php.ini-production  $prefix/etc/php.ini

#Set fpm.conf
cat>$prefix/etc/php-fpm.conf<<EOF
[global]
pid = run/php-fpm.pid
error_log = log/php-fpm.log
log_level = warning
emergency_restart_threshold = 30
emergency_restart_interval = 60s
process_control_timeout = 5s
daemonize = yes
include=$prefix/etc/php-fpm.d/*.conf
EOF
cat>$prefix/etc/php-fpm.d/default.conf<<EOF
[default]
;listen=127.0.0.1:9006
listen=/dev/shm/php-fpm.sock
listen.mode=0666
user=nobody
group=nobody
pm=dynamic
pm.max_children=128
pm.start_servers=20
pm.min_spare_servers=5
pm.max_spare_servers=35
pm.max_requests=10000
rlimit_files=51200
slowlog=log/\$pool.log.slow
env[PATH] = /usr/local/bin:/usr/bin:/bin:$prefix/bin
env[TMP] = /tmp
env[TMPDIR] = /tmp
env[TEMP] = /tmp
EOF

systemctl enable php-fpm
systemctl start php-fpm2010年之前的猫扑上有句话叫“有沟必火”.
放在今天的抖音上从“蓝色战衣” “郑女士说得对” “两颗大道理” 的火爆内容上依然在适用 . 再过几十年也会一直适用下去.
年轻的肉体在互联网就是流量密码.
cd /Library/Application\ Support/Microsoft/MAU2.0
sudo chmod 000 Microsoft\ AutoUpdate.app
设置权限到最低或者直接删掉, 这玩意烦得一逼, 还经常更新失败.
打开PowerShell
Get-WindowsCapability -Online | ? Name -like 'OpenSSH*'Add-WindowsCapability -Online -Name OpenSSH.ClientAdd-WindowsCapability -Online -Name OpenSSH.Server平时用于服务器维护只要安装OpenSSH.Client, 然后就可以像linux环境一样直接用ssh scp等命令了.
类似xshell这种玩意没啥必要安装了.
PS: Windows2019 server可以安装, 之前的2016 2012不能默认直接安装, 需要下载安装包.
先在机器上安装好Centos7, 然后正常启动会遇上Kernel panic无法启动的问题.
这个问题的主要原因是Centos7默认的Kernel 3.10不支持Ryzen, 需要安装5.2以上版本才能支持.
由于系统无法正常启动,这个时候需要用iso启动一个Rescue系统进去安装内核.
用Centos7的Rescue或者用systemrescuecd都可以.
启动好Rescue后的处理步骤大致如下
mount /dev/磁盘分区 /mnt ; cd /mnt
mount -o bind /dev dev/
mount -o bind /sys sys/
mount -o bind /proc proc/
mount -o bind /sys sys/
chroot /mnt
chroot后就可以用yum进行安装高版本的内核了.
参考文章链接http://kvm.la/1385.html
grub2-mkconfig --output /boot/grub2/grub.cfg
如果是chroot进去后可以用mknod创建文件
mknod -m 666 /dev/random c 1 8
mknod -m 666 /dev/urandom c 1 9下载连接http://dl.kvm.la/windows/IPMIToolWin.zip
从浪潮的网站上看到一个windows的ipmitool测试了一下正常可用,
在文件属性和命令看了一下,貌似是intel编译放出来的, 相对ipmiutil来说多了一个常用的工具选择.
原压缩包直接把文件拖了下来加了个一键安装IMB的脚本.
cat  IPMIToolWin/install_driver.cmd
if "%PROCESSOR_ARCHITECTURE%"=="x86" goto x86
if "%PROCESSOR_ARCHITECTURE%"=="AMD64" goto x64
exit
:x64
cd imbdriver\x64\
Install C:\IMBDRV\Test
exit
:x86
cd imbdriver\x86\
Install C:\IMBDRV\Test
浪潮的网站出处连接:http://www.4008600011.com/archives/15141
Centos7.8后可以安装官方的5.4内核
yum -y update centos-release
yum install -y yum-utils epel-release
yum-config-manager --enable centos-kernel
yum install kernel -y
确认升级完重启, 可以卸载3.10的内核了.
yum remove $(rpm -qa | grep kernel | grep "3\.10")
ip route replace default via 网关IP dev eth0 src 出口IP
若为同 C 段 IP,可以将其设置为函数:
# cat ~/.bashrc
function setip() {
    echo "ip route replace default via 192.168.1.1 dev eth0 src 192.168.1.$1"
    ip route replace default via 192.168.1.1 dev eth0 src 192.168.1.$1
    sleep 1
    curl ip.sb
}
# source ~/.bashrc
# setip 2
摘取自:https://www.myluoluo.com/linux-set-out-ip.html
1.修改路由表指定默认路由源ip,也可设置metric优先级指定出口ip:
ip route change default via 192.168.1.1 dev eth0 src 192.168.1.9
2.也可使用iptables snat,扩展可对目标ip、端口、应用软件等单独指定出口ip。
iptables -t nat -I POSTROUTING -o eth0 -d 0.0.0.0/0 -j SNAT --to-source 192.168.1.9
摘取自:https://www.haiyun.me/archives/1399.html
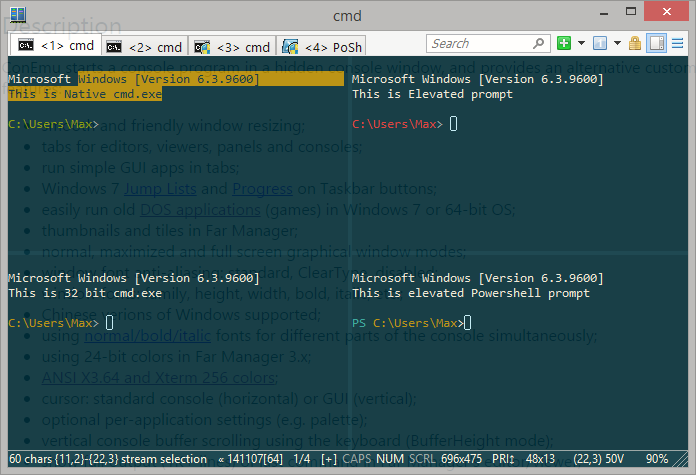
经常用原生的*nix环境后就回不去了, windows下的终端软件很多,但都不怎么感觉上手.
在windows10支持linux子系统后, 系统自带了常用的ssh scp rsync sftp等等常用命令后,类似于xshell这种更加显得鸡肋了.
在MACOS下的iTerm2相当的好使, 前些时候发现了ConEmu和iTerm2挺像的, 简洁干净利落.
在用户目录下把.ssh/id_rsa私匙存储好了, 基本上达到了无差别使用.
官方主页:https://conemu.github.io/
github源码主页:https://github.com/Maximus5/ConEmu
最新发布版本页面: https://github.com/Maximus5/ConEmu/releases