IPMITOOLS常用备忘
yum install ipmitool -y
modprobe ipmi_watchdog
modprobe ipmi_poweroff
modprobe ipmi_devintf
modprobe ipmi_si
Cheat sheet
yum install ipmitool -y
modprobe ipmi_watchdog
modprobe ipmi_poweroff
modprobe ipmi_devintf
modprobe ipmi_si
Cheat sheet
加入server段然后reload配置可以过滤掉低能的cc攻击。
if ($http_user_agent ~* (ApacheBench|pingback|WordPress|MJ12bot|AhrefsBot|360JK|PHP|php|Jorgee) ) {return 400;}
if ($http_user_agent = "" ) {return 101;}
if ( $request = "POST /reg.html HTTP/1.1" ) {return 400;}
if ( $request = "POST / HTTP/1.1" ) {return 400;}
if ( $request = "POST / HTTP/1.0" ) {return 400;}
if ( $request = "POST // HTTP/1.0" ) {return 400;}
wget http://download.openvz.org/openvz.repo -O /etc/yum.repos.d/openvz.repo
rpm --import http://download.openvz.org/RPM-GPG-Key-OpenVZ
yum update -y
yum install vzkernel -y
yum install vzctl vzquota -y
wget http://dl.kvm.la/shell/bash_profile -O /root/.bash_profile
wget http://dl.kvm.la/conf/ve-vswap-solus.conf-sample -O /etc/vz/conf/ve-vswap-solus.conf-sample
wget http://down.kvm.la/conf/sysctl.conf -O /etc/sysctl.conf
yum install -y epel-release
yum install -y denyhosts rsync iftop tcpdump ploop mtr fuse-sshfs fuse-devel
iptables -A INPUT -p tcp -m multiport --dport 25,110,465:587,993:995 -j DROP
iptables -A INPUT -p udp -m multiport --dport 25,110,465:587,993:995 -j DROP
iptables -A OUTPUT -p tcp -m multiport --dport 25,110,465:587,993:995 -j DROP
iptables -A OUTPUT -p udp -m multiport --dport 25,110,465:587,993:995 -j DROP
/etc/init.d/iptables save
wget --no-check-certificate https://raw.githubusercontent.com/teddysun/shadowsocks_install/master/shadowsocks-libev.sh
sh shadowsocks-libev.sh
wget --no-check-certificate https://raw.githubusercontent.com/teddysun/shadowsocks_install/master/shadowsocksR.sh
chmod +x shadowsocksR.sh
./shadowsocksR.sh 2>&1 | tee shadowsocksR.log
cd /tmp
yum update -y
yum install yum-utils yum-priorities vim-minimal subversion curl zip unzip telnet wget -y
setenforce 0 >> /dev/null 2>&1
sed -i 's/SELINUX=enforcing/SELINUX=disabled/g' /etc/selinux/config
wget https://github.com/mustafaramadhan/kloxo/raw/release/kloxo-mr.repo --no-check-certificate -O /etc/yum.repos.d/kloxo-mr.repo
yum clean all
yum install kloxomr7 -y
sh /usr/local/lxlabs/kloxo/install/setup.sh
sh /script/upcp
wget -c http://down.kvm.la/kloxo/kloxo_cn.tar.gz
tar zxf kloxo_cn.tar.gz -C /usr/local/lxlabs/kloxo/httpdocs/lang
sh /script/update --class=sp_specialplay --name=client-admin --subaction=skin --v-specialplay_b_s_language=cn
解决一些特殊情况问题,例如网络差,或者需要进入内网时候用得到,转抄回来存档。
ssh -o ProxyCommand='nc -x ${proxy_server}:${proxy_server_port} %h %p' xxx.xxx.xxx.xxx
如:
ssh -o ProxyCommand='nc -x 127.0.0.1:7070 %h %p' 8.8.8.8
需要注意的是,nc需要使用 OpenBSD 版本,非 Linux 默认版本(该版本不支持)通常,类 Debian 的衍生版本,都可以通过如下命令直接安装:
apt-get install netcat-openbsd
转抄自:http://blog.chenxiaosheng.com/posts/2013-12-20/ssh-through-socks-proxy.html
因为国服网的关系gmail已经是惨目忍睹,投递一封邮件简直感觉日了狗了,如下收集整理了三个方案只要有个墙外Linux的VPS或者服务器就能轻松解决问题了。
比较推荐使用第一种的xinetd作为service自动运行,第二种rinetd需要将命令写入启动自动运行(平时用的多)
其实这只能算是一个跳板,配置好后修改本机的hosts将对应的域名指向跳板IP。
注:因为是端口转发实现的,和跳板之间没有ssl所以会有一定的风险,请注意!
两年前就有人一直冒充域进行发送垃圾邮件,原文地址在http://www.kvm.la/Google-APPS-SPF-DKIM.html
今天查看垃圾邮件看到退件,发件人的IP是深圳。
本文主要说一下Windows系统的系统密码重置问题,对windows2003-2008的系统都适用, 键盘按键主要涉及到 数字+方向+Y键。
具体流程:
截图一:启动Windows PE系统,选择Max Dos维护系统.
截图二:选择Pwd登陆密码破解。
截图三:随便按一下空格或者回车就可以了;英文字符“press any key…”的意思是“按键盘的任意一个键”
截图四:按2选择 搜索所有硬盘分区SAM文件的分区。
截图五:正在等待搜索。
截图六: 显示已经找到分区上的SAM文件,按enter键(回车键,就是一般键盘上最粗大的那个按键)。
截图七:显示账号列表进行选择重置,例如输入0则选择Administrator账号。
截图八: 按Y键操作清除密码,黄色提示“清除此用户密码”前面的X代表已经勾选。
截图九:蓝底黑字显示已经属性已经修改成功,这时候可以直接操作重启系统。
前期预先准备参考文章http://www.kvm.la/837.html ,然后先发邮件或者提交工单给客服把挂载Windows PE并设置好启动。
后期准备,重置完密码后可以在VPS管理页面下设置启动顺序为硬盘优先,也可以让客服卸载windows PE。
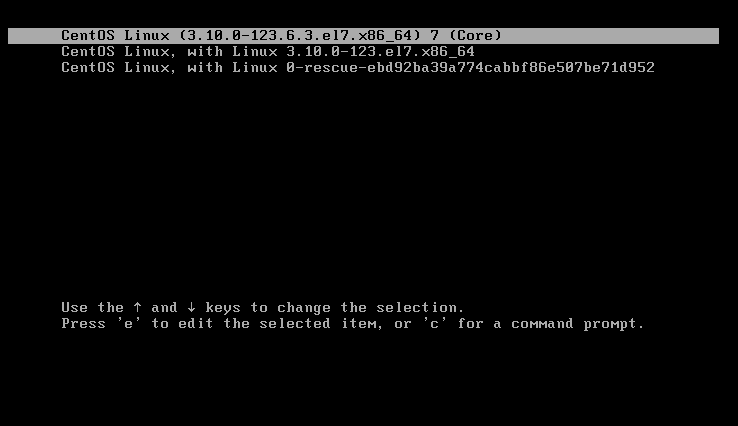
系统环境:centos6 mini
1、 重启服务器,在读秒的时候按任意键,就会出现如下界面
在此界面中按下键盘中的‘e’,从而进入grub模式
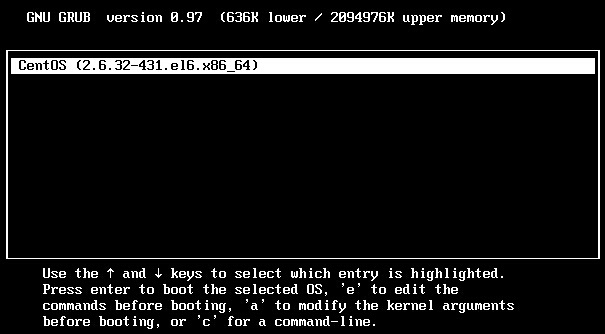
2、在1中按下e就会进入到如下界面。
将光标移动到kernel那一行,然后再一次按‘e’,进入kernel该行的编辑界面
最近发现几个vps的Rsyslogd进程非常怪异占用CPU高的时候能达到200% ,几个相同之处都是ubuntu的系统
google半天后发现禁用imklog就可以解决了.
sed -i 's/^\$ModLoad imklog/#\$ModLoad imklog/g' /etc/rsyslog.conf
后面将修改所有系统模板彻底解决问题
本文基于:Kvm+Windows2008 VPS+VNCviewer
有时候遇上IP没设置好,IP被封,调整磁盘,重置windows系统密码等等使用基于VNC的控制台对VPS进行操作是非常方便的。
有时候网页加载java版的VNCviewer会失败,多半时候是安全设置问题,一些是没有安装java。
这时候可以使用软件版的VNCviewer http://down.kvm.la/windows/vncviewer.zip
在控制台页面下找到,VNC连接的参数,IP/端口/密码
VNCviewer软件版的连接格式是 IP地址:端口号 例如192.0.0.2:6114
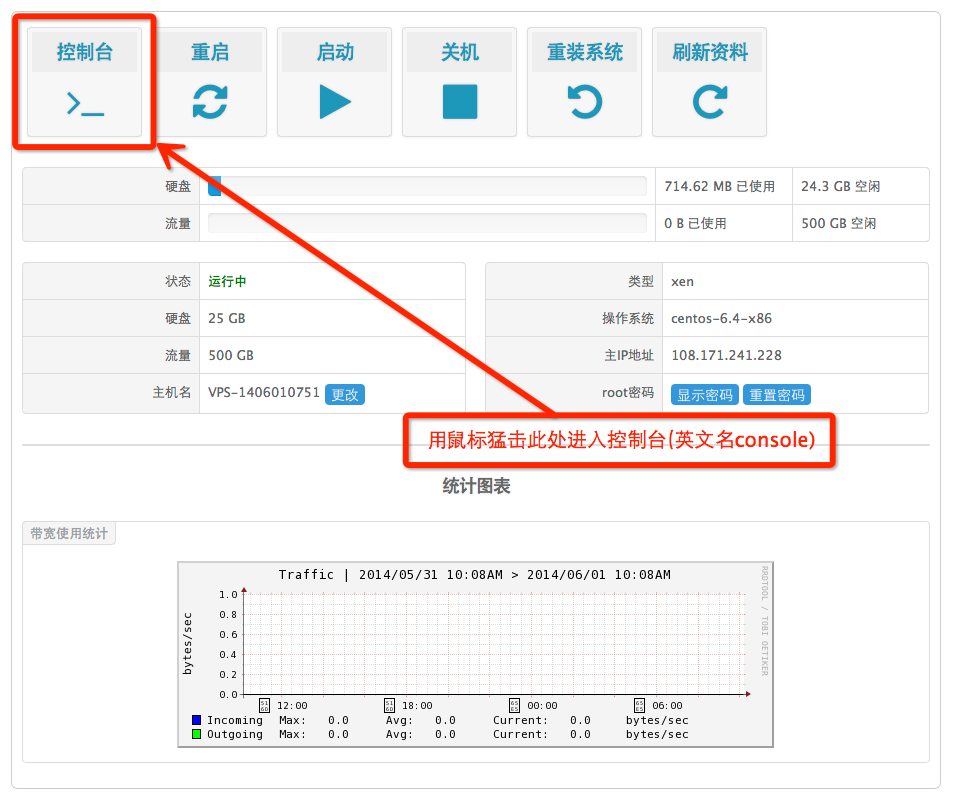
本文基于: Xshell和Linux Xen vps为基础截图。
当IP被封或者sshd设置不当造成无法启动或者连接不上的这个时候,你就可以使用控制台进入系统进行操作了,这样下来妈妈再也不担心我把VPS撸坏了。
言归正传