juniper快速导入和导出配置
备份到文件
show configuration |display set |save backup.txt
从备份载入配置
load set backup.txt
log syslog all;
debug protocols off;
debug commands 0;

router id 1.1.1.1;

protocol static rtbh {
	route 99.99.99.99/32 blackhole;
	route 88.88.88.88/32 blackhole;
}

filter export_rtbh_out {
	# Limit to static routes
	if (proto = "rtbh") then
	{
		# Limit to /32 host routes (for now)
		if net.len = 32 then
		{
			bgp_community.add((65001,9999));
			bgp_next_hop = 192.0.2.1;
			accept;
		}
	}
	reject;
}

protocol bgp ER3 {
	description "iBGP to Edge Router 3 for RTBH";
	debug { states, events };
	local 1.1.1.1 as 65001;
	neighbor 3.3.3.3 as 65001;
	import none;
	export filter export_rtbh_out;
}
protocol bgp ER4 {
	description "iBGP to Edge Router 4 for RTBH";
	debug { states, events };
	local 1.1.1.1 as 65001;
	neighbor 4.4.4.4 as 65001;
	import none;
	export filter export_rtbh_out;
}
routing-options {
	static {
		route 192.0.2.1/32 discard;
	}
}

protocols {
	bgp {
		group RTBH {
			type internal;
			import import-from-rs;
			expor deny-all;
			neighbor 1.1.1.1;
		}
	}
}

policy-options {
	policy-statement deny-all {
		term 1 {
			then reject;
		}
	}
	policy-statement import-from-rs {
		term 1 {
			from {
				community RTBH;
				route-filter 0.0.0.0/0 prefix-length-range /32-/32;
			}
			then accept;
		}
		term reject {
			then reject;
		}
	}
	community RTBH members 65001:9999;
}
抄录自https://gist.github.com/floatingstatic/854aa504a92ab8bc3e044e434ec378c4

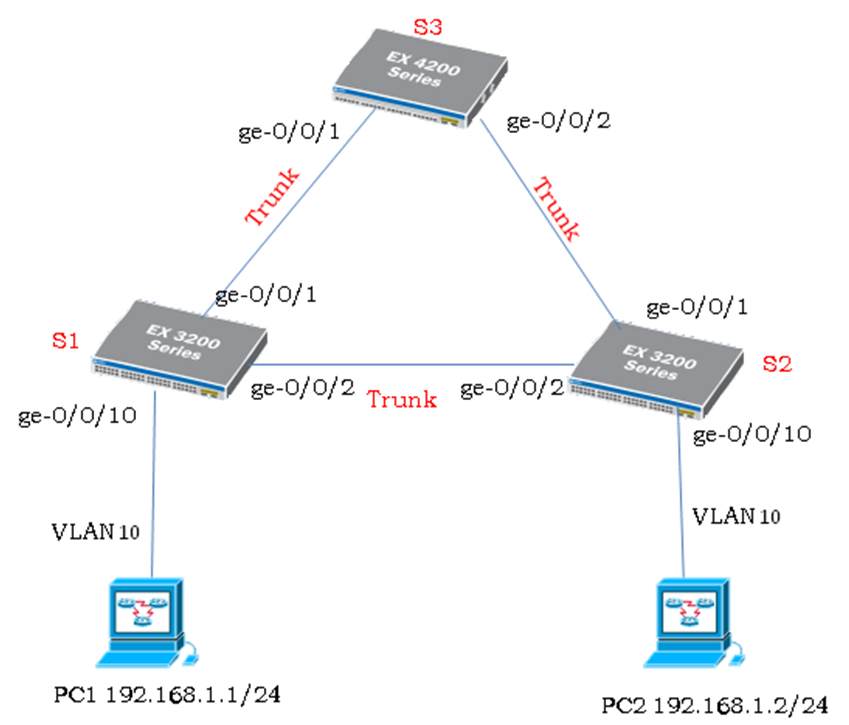
S1交换机:
set protocols stp enable #"打开stp功能"
set protocols stp bridge-priority 8k #"设置stp的优优先值"
set protocols stp interface ge-0/0/1.0 priority 8 #"设置stp端口优先值"
set protocols stp interface ge-0/0/2.0 priority 8
S2交换机:
set protocols stp enable
set protocols stp bridge-priority 16k
set protocols stp interface ge-0/0/1.0 priority 16
set protocols stp interface ge-0/0/2.0 priority 16
S3交换机:
set protocols stp enable
set protocols stp bridge-priority 32k
set protocols stp interface ge-0/0/1.0 priority 32
set protocols stp interface ge-0/0/2.0 priority 32
检查命令:
Show span-tree bridge
转载自:http://mtonet.com/?p=282
说明:EX交换机除了具有二层VLAN功能之外,还具有三层VLAN路由功能。
EX交换机会有一个名字为vlan的三层逻辑端口,这个三层逻辑端口可以划分多个逻辑unit单元,unit号范围是(0..16385),而每个逻辑unit单元可以配置IP地址然后跟一个VLAN绑定,实际上unit 单元号和VLAN号没有对应关系,但是为了维护方便,我们建议在实际应用中unit单元号和vlan号配置相同(如下面的vlan.10中的10是unit单元号,它实际上可以跟VLAN 20绑定,但是在实际中最好将它和vlan 10绑定),这样在EX上就可以配置不同VLAN的网关地址了。
例如下面交换机划分了3个VLAN,每个VLAN对应的网关IP分别配置在vlan.10 、vlan.20以及vlan.30端口(跟Cisco的interface vlan10和interface vlan20,interface vlan30效果一样的)。
一、添加/修改VLAN
如果创建一个名字为liy_vlan的VLAN 10,并且网关设置为192.168.1.1/24,ge-0/0/1属于该VLAN。
配置步骤:
(1)创建VLAN
#编辑vlan信息liy_vlan是vlan名字,如果不存在则新建一个VLAN
lab@EX4200-1# edit vlans liy_vlan #"以下所有操作都是对liy_vlan进行"
[edit vlans liy_vlan]
lab@EX4200-1# set vlan-id 10 #"设置liy_vlan的vlan id"
lab@EX4200-1# set description "Server VLAN" #"设置vlan描述"
lab@EX4200-1# set mac-limit 200 #"设置mac数量,范围是(1..65535),通常不配置"
lab@EX4200-1# set mac-table-aging-time 600 #"设置mac生存时间(秒),范围是(60-1000000) "
lab@EX4200-1# set l3-interface vlan.10 #"将绑定三层逻辑子端口"
lab@EX4200-1# set interface ge-0/0/1.0 #"将端口加入到VLAN中"
lab@EX4200-1# set interface ge-0/0/2.0 #"将端口加入到VLAN中"
(2)创建三层逻辑子端口
lab@EX4200-1# top #"回到最外层菜单"
[edit]
lab@EX4200-1# set interfaces vlan unit 10 family inet address 192.168.1.1/24
(3)将交换机端口修改为access模式并加入到新创建的VLAN中
lab@EX4200-1# top #"回到最外层菜单"
[edit]
lab@EX4200-1# set interfaces ge-0/0/1 unit 0 family ethernet-switching port-mode access
lab@EX4200-1# set interfaces ge-0/0/1 unit 0 family ethernet-switching vlan members 10
lab@EX4200-1# set interfaces ge-0/0/2 unit 0 family ethernet-switching port-mode access
lab@EX4200-1# set interfaces ge-0/0/2 unit 0 family ethernet-switching vlan members 10
(4)commit提交:
lab@EX4200-1#commit
二、删除VLAN
由于一个VLAN创建之后,会被端口引用,可能还创建了三层端口,因此在删除vlan的时候需要把端口引用关系接触同时删除三层vlan子端口,删除步骤如下:
1.删除端口vlan
lab@EX4200-1# top
[edit]
lab@EX4200-1# delete interfaces ge-0/0/1 unit 0 family ethernet-switching port-mode access
lab@EX4200-1# delete interfaces ge-0/0/1 unit 0 family ethernet-switching vlan members 10
lab@EX4200-1# delete interfaces ge-0/0/2 unit 0 family ethernet-switching port-mode access
lab@EX4200-1# delete interfaces ge-0/0/2 unit 0 family ethernet-switching vlan members 10
2.删除vlan对应的L3子端口
lab@EX4200-1# top
[edit]
lab@EX4200-1# delete interfaces vlan unit 10
3.接着删除vlan配置
lab@EX4200-1# top
[edit]
lab@EX4200-1# delete vlans liy_vlan
转载自:http://mtonet.com/?p=268
EX交换机在前面面板LCD旁边,有一个alarm的告警LED灯,当系统出现出现alarm之后,除了在系统日志中反映出来,还可以通过LED显示出来。可以设置端口down产生告警,并且定义LED的显示颜色。EX不支持对单个端口定义产生alarm告警,只能对全部端口或者MGT管理端口产生link down的alarm告警,一旦端口down之后会在alarm LED上显示出来。(注意:如果设置了端口link down的alarm告警,则不用的端口最好disable)
配置方法:
lab@EX4200-1# top
[edit]
lab@EX4200-1# set chassis alarm ethernet link-down red #"设置全部端口产生告警"
lab@EX4200-1# set chassis alarm ethernet link-down ignore # "全部端口不产生告警"
lab@EX4200-1# set chassis alarm management-ethernet link-down red# "MTG端口产生告警"
link-down后面可以选择的参数有:
ignore Do not assert any alarm signals
red Assert red system alarm
yellow Assert yellow system alarm
转载自:http://mtonet.com/?p=265